A logo is the face of your business, this is how people determine wether they like the look of what your are offering…
¢ Its the first impression
¢ who you are
¢ its what you sell
¢ communicates the message
¢ be CREATIVE with your business name
Some people have fantastic products, but there image lets them down…
Let me help you!
What makes a good logo?
A simple logo design allows for easy recognition and allows the logo to be versatile & memorable.
I offer the highest quality in service, customer support and for the best value for money. Dont just take my word for it, read some of my client testimonials or check out my portfolio. If you were after a brand identity / logo design drop me an email or visit my website.
Another great tutorial in our guest post series, this time from the lovely Julie from MOOPs and Hoops.
Thank you Julie for your take on the ‘Handmade Bowl’.
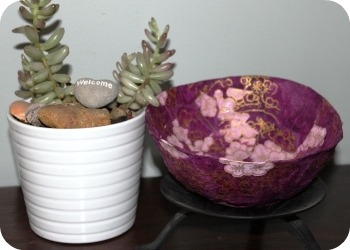
I was looking through my old craft project books a few months ago and came across this handmade bowl section. Why not give it a go I thought¦..so here I am a few weeks later taking photos and writing a few notes on how to make one for yourselves.
I couldn’t find any paper that I really loved in time for Handmade Kids to post this but it should give you an idea of what you can achieve. All shapes and sizes can be done and I had a lot of fun making it. Because there are several layers, it is something you can do over a few nights and even something the kidletts can have a go at, especially over the school holidays. We sooooo need some projects to keep them occupied! It would be great to see everyones crafted bowls when they are finished¦.I just love seeing other peoples crafts- why not to our Handmade Kids facebook wall. Have Fun!
The key to this project is to take your time and simply build up the layers until you have a form that appears fragile, but is actually strong. Fill with dried flowers or rose petals or use for whatever purpose you like, whether display, storage or simple ornament. Just have some fun and get glue everywhere!!
Supplies you will need:
– Newspapers
– PVA glue
– Mixing bowl
– Clingwrap (glad wrap!)
– Glass or metal bowl the same shape & size you want your handmade bowl to be
– Med to large paintbrush
– Hand-made paper sheets that can tear apart (2 to 4 sheets depending on size of bowl)
Directions:
1. Cover your work area with plastic or newspapers. Mix up a small amount of PVA glue with some drops of water. (You want it still as a sticky glue but slightly watered down, dont make it too runny!) With the clingwrap, cover the entire bowl that you will use as a mould.
2. Cut the newspaper into strips approx 2cm wide x 6 cm long. Using the paint brush, paste the strips using the PVA glue into the clingwrap bowl. Overlapping rows on the inside of the bowl, smoothing down the strips as you go. You can make the edge of the bowl smooth by cutting edges later when dry or leaving rough to add another textured look.
3. Keep pasting layers inside the bowl, going in a different direction to the previous layer. Allow to dry in between layers. Continue until you have applied at least six layers, leaving each layer to dry individually. When the final layer is dry, carefully remove the paper bowl from the mould and remove the cling wrap.
4. Tear up the hand-made paper and using the PVA glue (watered slightly down), over the inside of the bowl first, then the outside of the bowl.
5. Set the bowl aside, so that the glue has time to dry completely before use. You can leave as is or also spray with a clear lacquer glaze (I use folk art clearcote extra think Glaze by Plaid. It gives a glossy finish that is non yellowing)
Notes:
The more layers you apply the stronger the bowl will be. If you make a large bowl, you will need to apply more layers so that it is strong enough to support its own weight.
A huge thanks to Jess from The Elven Garden for sharing this fabulous doll quilt tutorial. Be afraid no more, Jess has made this tutorial really simple and easy to follow. I’m sure that there were lots of little dolls that were gifted this Christmas, this would be the perfect accompaniment to their little beds.
If you’ve never made a quilt before or are a bit put-off by the whole quilty thing this is the perfect introduction to the world of quilting. Its an improvisational style of quilt, so there is no wrong way to do it “ you literally make it up as you go along! All the measurements in this tutorial will be in inches because thats how I think in quilting terms (although in all other aspects of life Im a metric girl¦ go figure?!) A simple conversion is 1 inch = about 2.5cm. This is not a precise quilt so around-about measurements will work fine.
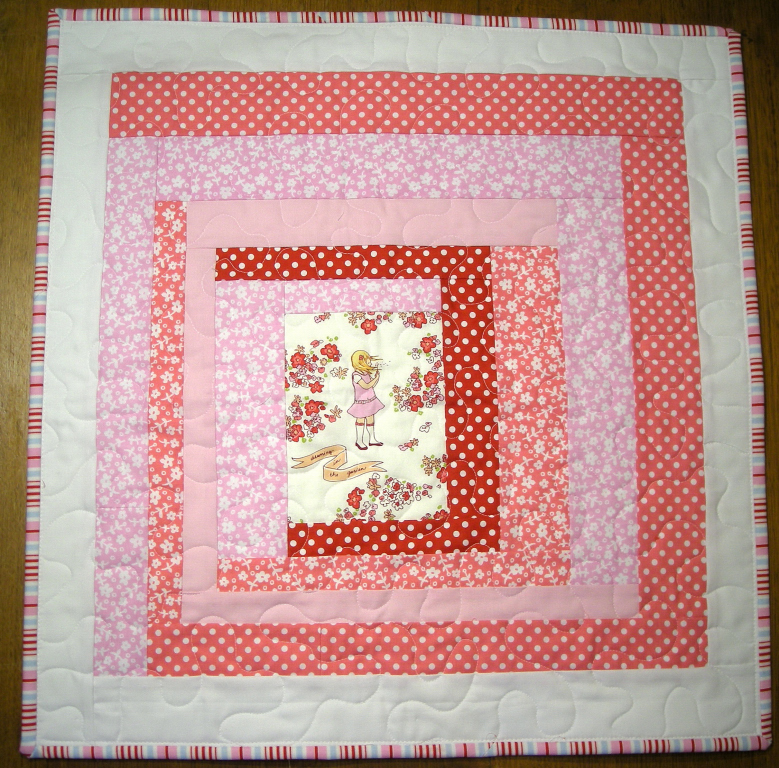
This quilt is based on a very traditional quilt block called a log cabin block.
What youll need:
My finished doll quilt measures about 21 square. This is kind of big for a doll quilt “ if the little person youre making this for has a doll bed, perhaps measure that and work out how big youd like the quilt to be, and use those measurements to size your quilt.
Some fabric scraps/strips “ about 10-15 pieces of fabric, about 4 wide and at least 21 long. If you dont have a scrap basket, a jelly roll (42 pieces of pre-cut fabric, 42 long and 2.5 wide) would be perfect for this project. There is a great Australian online shop run by Quiltjane “ she has a great range of pre-cut Moda fabrics.
I used a variety of fabrics, and cut them into 1 ½, 2 and 2 ½ strips.
A piece of backing fabric for your quilt “ around 22 square (you could use a fat quarter of fabric, and make your quilt to those dimensions “ usually around 18 x 21)
Neutral coloured thread (light for light fabrics, or dark if using dark fabrics)
A sewing machine (with a quarter inch or patchwork foot is helpful, but not essential)
Rotary cutter, mat and ruler “ although you could complete this project using scissors, a ruler and pencil.
OPTIONAL:
If you have a sewing machine with a walking foot, you might want to quilt and bind your doll quilt as I have done. Ive never done this without a walking foot, so you could give it a go but a walking foot makes it much easier to sew through all the layers without your fabric moving around. If you choose to quilt it you will also need:
A piece of batting the same size as your backing fabric
About 2-3 strips of fabric 2 ½ wide to bind your quilt.
Curved safety pins
Getting started:
1. Choose the fabric youd like at the centre of your quilt “ I fussy cut the picture of the girl, but you could use any size piece for the centre
2. Select your first piece to sew onto the centre
3. Place your strip right sides together on top of the centre piece, and pin in place
4. Sew these together, using a ¼ seam if possible (if you dont have a patchwork foot for your machine, you could use the edge of your normal foot and this would work fine)
5. Press your seam flat, and then GENTLY press it away from the central piece. This is not like ironing fabric “ fingerpress the seam across, by holding the fabric over and running your finger along the seam line. Then take your iron and press it straight down onto the fabric, and lift up, without moving it back and forth across the fabric.
6. Trim the edge of the two pieces so you have a straight edge. I use a rotary cutter and ruler to do this “ you could use a normal ruler and pencil to mark the excess bit and then cut it off with scissors.
7. Select your next piece of fabric, place it right sides together with your central piece and sew as per step 4.
8. Continue sewing strips of fabric around in a clockwise (or anti-clockwise direction “ it doesnt really matter) until you have a quilt top the desired size. For my final logs I used solid white fabric, but this is completely up to you.
9. Square up you quilt top so the corners are at right angles. This is where a rotary cutter and mat come in very handy “ although again, you could use a normal ruler and pencil and mark where you need to cut with scissors.
10. If you arent quilting it with batting etc, trim your backing fabric to the same size as your quilt top. Lay your backing piece on top of the quilt top, right sides together, and sew around the edge using a ¼ seam. Leave an opening about 10cm long so you can turn your quilt the right way through.
11. Trim the corners close to the stitching, to reduce the bulk. Turn the quilt the right way out, and press it flat. Handstitch the opening closed, making sure the seam allowance is tucked in. Sew around the edge of the quilt about 1cm from the edge “ and youre done!
If youre choosing to quilt with batting and then bind your quilt please continue reading:
Quilting your Doll Quilt:
1. Lay the backing fabric right side down, and lay your batting on top. Smooth it by running your hands across, starting at the centre and working your way out. It might help to turn the two layers over and do this with the backing fabric on top.
2. Lay your quilt top on the batting, and smooth it out as per step 1.
3. Use your curved safety pins to pin the three layers together “ start in the middle and place a pin every 5 or so right out to the edge of your quilt.
4. Use your walking foot to quilt the layers together. You could do this anyway you like. An example is a quilt I made for my daughter . I quilted this by following the edges of the fabric strips, and quilted ¼ in from each seam, working around the quilt in a clockwise direction.
5. You could also sew straight across (or up and down) the quilt, or if you are keen to try free motion quilting, this would be the ideal small quilt to give it a go. There are heaps of tutorials around for how to do it “ a really great one is here
Binding your doll quilt:
1. To work out how much binding youll need, add the four sides of your quilt together (so for a 21 square quilt, youd need 21 x 4 = 84) and add about 12 for joining the ends of your binding. You could make a scrappy binding, or use a single fabric. Either way, cut the ends of your 2 ½ wide fabric strips at a 45 degree angle:
2. Place two strips right sides together, at right angles to each other, so you have about ¼ overlap at each side, and pin in place:
3. Sew along this edge, back stitching at each end.
4. Sew each of your strips together in this manner, so you have one long strip the desired length.
5. Press the seams open
6. Fold one end of the strip over (about ¼) and press
7. Fold the strip in half lengthwise, WRONG sides together, and press
Youll end up with a long strip of binding ready to sew onto your quilt.
8. Lay your binding strip, starting with the folded end, on your quilt top, lining up the raw edges of the binding strip with the edge of the quilt top. Leave the top part of the binding strip free (this will be a pocket for the end of the binding) and start sewing beyond where the folded edge ends “ where I have placed a pin.
9. Backstitch a few stitches at the start, and sew along through all the layers, about ¼ from the edge. Stop about ¼ from the end of this edge, backstitch a few stitches and take the quilt off your sewing machine.
10. Fold the binding up, and then down to create a mitred corner:
11. Start stitching down this side of the quilt, starting about ¼ from the top edge (backstitching a couple of stitches again)
12. Mitre each corner as you come to it in the same way.
13. When you are approaching the start of the binding, stop about 6 away. Trim the tail end of your binding strip, so that its the right length to slip into the pocket created by the start of the binding strip. Pin the underneath edge at the very start of your binding:
And then tuck the end of your binding strip into the pocket:
Fold the leading end back over the binding strip, and keep sewing until you meet up with your first stitches. Backstitch a few stitches.
Turn your binding over to the back of the quilt, and hand stitch in place. And youre finished!
—————————————————————————————–
Now Closed- The fabulous Jess is also give you the chance to win this dolls quilt and matching pillow. I see a very lucky little girl and an awesome addition to for that treasured little dolly.
Entries for the giveaway will be open from December 27th until January 3rd 2011 at 8pm. The winner will be drawn using a random generator, and the winner will be announced on The Elven Garden Facebook page.
So what are you waiting for, go check The Elven Garden out!
This is the first of our guest post series over the Christmas / New Years break. We have some great posts lined up, so please do take the time to grab a cuppa, check in, and have a read.
Our first guest is the lovely Bec from Lorenzo’s Playground. She’s here to share her tips for taking great photos.
Hi everyone, Bec here from Lorenzo’s Playground with my very first guest post!
I am a mum, graphic designer and teacher. I am blessed with 2 little girls, 31 months and 16 months. Busy, noisy but fun times! As you can imagine we go on many walks to local playgrounds, and back when they were much younger, I decided to combine these walks with another of my greatest loves photography!
For over a year now, I have been taking a photo almost every day of things that make me stop and smile. It can be very easy to focus on the negative things in your life, but if you are keeping an eye open for the worlds hidden wonders, you start to notice just how much there is to smile about each day.
With Christmas approaching, you may be lucky enough to have more time with the little people in your lives. It is the perfect time to pick up your camera and start capturing your own smile moments. Here are a few tips to get you started:
1. Using a phone is ok I might be totally controversial here, but I am not embarrassed to admit that I use my iPhone camera A LOT! I own a digital SLR and an automatic compact camera, but my iPhone is with me all the time. It is the perfect way to capture the unexpected finds.
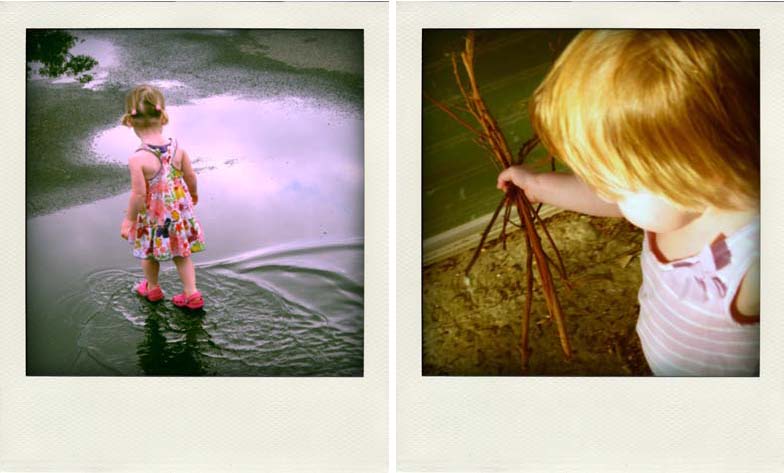
2. Don’t be afraid of taking loads of photos in this digital age there is no reason to limit the amount of photos you take at one given moment. You will be surprised how many photos it takes for a photographer to get the right shot (I was always told 1 in 10 are a success!) And personally I like the ones that aren’t quite right. They are often quirky and capture something special. And shown as a series they can tell a lovely story.
3. Look up, look down there are beautiful moments all around you. If you focus on what is in front of you, you might just miss something special.
4. People don’t need to be looking at the camera need I say more! I just love these 2 photos of my little girl happily playing. There is no need for a smile to camera here!
5. Share your photos with others I started off sharing my project with friends and family on Facebook. Their response was so positive, it was becoming obvious that by sharing my own smiles, I was making other people smile too. It felt great!
I now make cards out of my photographs and mail them out to people with a message about why I had chosen to mail that particular image to them. Sometimes they return a smile to me. I love sharing that moment with them.
I hope these tips help you capture the things that make YOU smile this festive season and beyond. I would love to see what you capture, so please feel free to email me any photos you wouldn’t mind me sharing own my own blog site.

 —————————————————————————————–