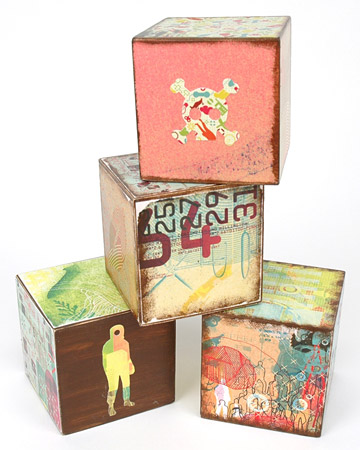
I love wooden blocks, a long running favourite for babies of all ages. Today I happened to be on the Martha Stewart Website and came across this great tutorial to create decorative wooden baby blocks to decorate your nursery or playroom.
I would not recommend these for babies to actually play with or chew on due to the paints & glues used in this crafty tutorial.
Tools and Materials
3 1/4-inch square wood block
Sandpaper
Scissors
Acrylic paint
Mod Podge
Paintbrush
Decorative paper
Emery board
Letters, numbers, and embellishments
Sponge
Baby Wooden Blocks How To
1. Sand the wooden block with sandpaper to prepare it for painting.
2. Paint the block with the color you’ve selected. Allow to dry.
3. Cut 6 pieces of decorative paper to 3 1/4 inch.
4. Glue the paper to each side of the block using all-purpose Mod Podge. Allow the glue to dry.
5. Sand edges and corners of paper with an emery board.
6. Paste the letters, numbers, and embellishments to the block using the same technique.
7. Sponge the edges of the paper with paint to give it texture and an antique look.
8. Paint another coat of Mod Podge all over the block to seal. Allow to dry.
PLEASE NOTE: This tutorial has not been created by Handmade Kids but has been sourced from the beautiful Martha Stewart Website
Fabulous activity! Any idea where to buy these blocks in bulk? Preferably in Queensland. Thanks. 🙂